Discover how we built our app in 2 weeks using Ionic Framework
Airport Parking Shop is an established online comparison website that’s just celebrated its 11th year. Over the past few years we have watched as mobile (and tablet) usage has soared from just 8% of our traffic in October 2011 to 44% in October 2014. We couldn’t ignore this trend and so earlier this year we took the plunge and completely rebuilt our site with a mobile friendly responsive design.
Despite now having a very functional and mobile optimised site, with mobile use set to exceed 50% in the next few months, the next logical step was to offer our mobile users a more native experience so we decided build a dedicated app for both Android and iOS.
Having built both PhoneGap, Java (Android) and Objective-C (iOS) apps in the past, we were quite aware of the pros and cons, which in our opinion can be summarised as follows:
| Pros | Cons | |
|---|---|---|
| PhoneGap |
|
|
| Android Java Eclipse |
|
|
| iOS Objective-C Xcode |
|
|
Why Ionic
Having looked at all these factors, we did some research and stumbled across Ionic.
Ionic is a relatively new framework for building hybrid mobile apps (web technologies wrapped as native applications) and has only just gone from alpha to beta; that said, the repo has been starred nearly 11,000 times and the framework has over 13K followers on Twitter.
Ionic is essentially a wrapper around the already very popular Apache Cordova framework (think PhoneGap), but comes with its own very powerful CLI tools and a wealth of documentation. Particularly impressive for such a new project.

According to the Ionic website, the framework is “Performance Obsessed”. Performance issues were the main reason we shied away from PhoneGap and hybrid apps in the past, so this gave us some confidence that it was time to try them again. The framework also comes with a set of very well designed UI components, uses Bower & NPM and is written in AngularJS and SASS (optional), which are some of the most popular tools and frameworks out there and most likely key to Ionic’s popularity.
Getting Started with Ionic
First of all, Ionic is an NPM package, so make sure you have Node and NPM installed and then run:
npm install -g cordova ionic
This will get you set up with the Ionic CLI tools and creating your first boilerplate app can be done with a single command:
ionic start --sass -appname "Airport Parking Shop" --id com.fubra.aps aps_app tabs
Now with the boilerplate app ready, simply ‘cd’ into the newly created app directory and run:
ionic serve
This will start the Ionic server (with live reloading) and launch your newly created app in the default browser!
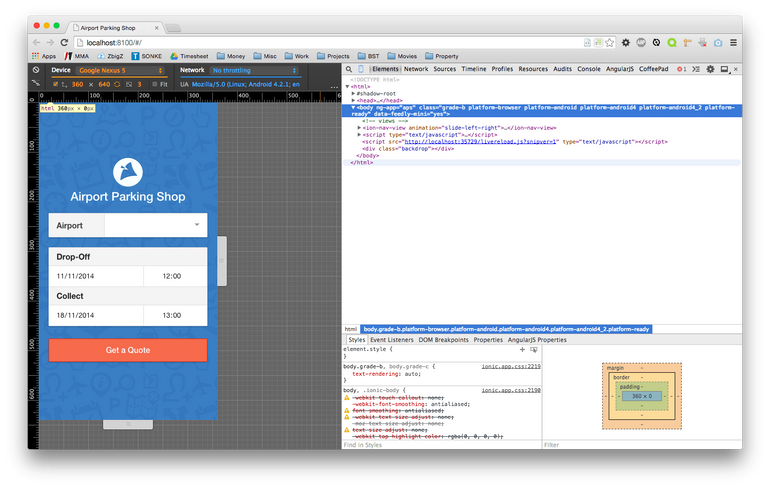
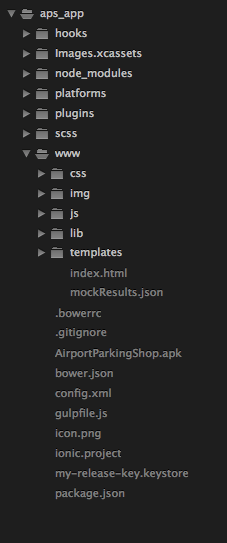 The boilerplate file structure should be familiar to anyone who has ever used PhoneGap or AngularJS. All the app files, HTML, CSS & JS, reside in the www directory and all the Cordova plugins, SASS etc. in the app’s root directory.
Inside www you’ll see a typical AngularJS app with controllers, templates etc.
Whilst AngularJS knowledge isn’t necessarily essential, it will certainly help a lot and together with the excellent Ionic documentation the learning curve is minimal.
Ionic also provides a very good learning portal at learn.ionicframework.com and sites such as StackOverflow are full of helpful discussions and suggestions.
Building the Airport Parking Shop App
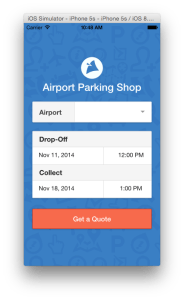
Our app uses a simple landing page with a quote form that is made up of a select list and some date/time pickers.
To set up the main view we have a simple route set up in www/js/app.js pointing to our quote.html template and declaring the view’s controller as QuoteCtrl, which we created in the www/js/controllers/ directory:
// Configure routing
.config(function($stateProvider, $urlRouterProvider) {

	// Configure routes
	$stateProvider

		.state('main', {
		url: '/',
		templateUrl: 'templates/quote.html',
		controller: 'QuoteCtrl'
	});

	// Default Route
	$urlRouterProvider.otherwise('/');
})
Next, we wrote the markup for our quote form and started looking at options for the date/time pickers, of which there are lots to choose from. That said, we didn’t really want to introduce another dependency such as jQuery, we wanted something optimised for mobile, and most importantly, we wanted whatever could be implemented the quickest and with the least amount of coding.
The obvious choice then was native HTML5 date and time inputs:
<input type="date"/>

<input type="time"/>
They work brilliantly on both iOS and Android (4.4+) and required hardly any work.
The final quote form looked like this:
<!-- quote form -->
<div class="row responsive-sm">
    <div class="col col-50 col-offset-25">
        <div class="list box">
            <label class="item item-input item-select item-divider">
                <div class="input-label">
                    <strong>Airport</strong>
                </div>
                <select class="close-left" ng-model="pickers.airport">
                    <option value="ABZ">Aberdeen</option>
                    <option value="BHD">Belfast City (George Best)</option>
                    ... and so on


                </select>
            </label>
        </div>
        <div class="list box">
            <div class="item item-divider">Drop-Off</div>
            <div class="item picker-input">
                <input type="date" ng-model="pickers.startDate" ng-change="updateCleanEnd()" class="date close-right" />
                <input type="time" ng-model="pickers.startTime" class="time" />
            </div>
            <div class="item item-divider">Collect</div>
            <div class="item picker-input">
                <input type="date" ng-model="pickers.endDate" ng-change="setDirty()" class="date close-right" />
                <input type="time" step="60" ng-model="pickers.endTime" ng-change="setDirty()" class="time" />
            </div>
        </div>
    </div>
</div>
With the quote form hooked up to a controller and the picker values working, we were ready to start requesting some data.
We wrote a very basic AngularJS service calling the Airport-Parking-Shop REST API which we already use for the results on our website.
The service uses the AngularJS $http object for the GET request and returns a promise, again using the built in $q object in the AngularJS framework. The core method of the service looked like this:
params.callback = 'JSON_CALLBACK';

// Create promise
var deffered = $q.defer();

// Do request
$http({

	method: 'JSONP',
	url: 'https://www.airport-parking-shop.co.uk/rest-api',
	params: params,
	cache: false

}).success(function(data) {

	// Check results was found
	if (data.status === 200 && data.results.length) {

		// Resolve with success
		deffered.resolve({
			status: 200,
			results: data.results
		});

	} else {

		// Resolve with no content
		deffered.resolve({
			status: 204
		});

	}

	// If error then simply resolve with error
}).error(function() {

	// Resolve with error
	deffered.resolve({
		status: 500
	});

});
An essential feature was to allow the user to go back from this results view and maintain the exact state of the quote form. This could of course be done in many ways using the AngularJS router, cookies etc. but again, instead of setting up more routes and states, we opted for a standard Ionic modal view which again required minimal code to implement and looked like this:
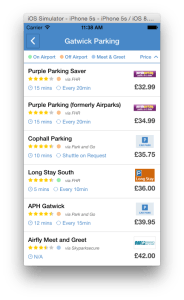
<ion-modal-view id="results" ng-controller="ResultsCtrl">
<!-- Header bar -->
<div class="bar bar-header bar-positive">
<!-- Back Button -->
<button ng-click="modal.hide()" class="button button-positive icon ion-chevron-left"></button>
<h4 class="title">{{airport}} Parking</h4>
</div>
<!-- Main content -->
<ion-content class="has-header has-subheader" ng-class="{ 'ios' : ios }">
<!-- Visible when all results is filtered -->
<div id="bgMsg">No Results</div>
<!-- Results List -->
<ion-list>
<ion-item ng-click="openBrowser('{{item.bookingUrl}}')" target="_blank" ng-repeat="item in results | orderBy:predicate" ng-show="carpark_type[item.parking_type]" class="result item-icon-right">
<div class="row">
<div class="col">
<h3>{{item.carpark_name}}</h3>
<p>
<img src="img/stars/stars_{{item.avg_rating}}.png" class="rating">
<i class="{{item.parking_type}} ion-record key"></i>
<small>via {{item.partner_name}}</small>
</p>
<p class="info">
<span class="ion-clock">{{item.transfer_time_int}}
<span ng-show="item.transfer_time_int != 'N/A'">mins</span>
</span>
<span class="ion-ios7-loop-strong" ng-show="item.transfer_time_int > 0">{{item.transfer_freq}}</span>
</p>
</div>
<div class="col col-20 price">
<div class="loading logo_container" rn-lazy-background="'{{item.logoImage}}'" rn-lazy-loading-class="loading" rn-lazy-loaded-class="loaded"></div>
<strong>{{item.amount | currency: "£"}}</strong>
</div>
</div>
</ion-item>
</ion-list>
</ion-content>
</ion-modal-view>
The modal view can then be initialised and controlled with a snippet of JS and allows results to slide over the quote form in a very native looking way, without ever reloading the quote form and thus maintaining the state prior to the user submitting the form. The JS to control the modal view looked something like this:
// Create results modal
$ionicModal.fromTemplateUrl('templates/results.html', {

	scope: $scope,
	animation: 'slide-in-right'

}).then(function(modal) {

	$scope.modal = modal;

});

// Show Results
$scope.modal.show();
Finally, having a working quote form, API service and results view, we needed to find a way to link to car park providers’ websites where the user can either perform the booking or navigate back to the results whilst still maintaining the results and quote form state.
Now, with our JSON results in, we moved on to create a single list view for displaying the results.
Linking to the device’s browser was an option, but this would take the user several steps away from the app and just wasn’t ideal. Luckily, Ionic supports all standard Cordova/PhoneGap plugins, so we opted for the Cordova in-app browser plugin and again, with the help of the Ionic CLI tools, installing this plugin was very straightforward.
ionic plugin add org.apache.cordova.inappbrowser
With the in-app browser installed, displaying the car park provider’s website in a pop-up browser can be done with a snippet of JS which looks something like this:
// Create inappbrowser
 var browser = window.open(url, '_blank', 'enableViewportScale=yes,closebuttoncaption=Back');
Now that we had a fully functioning app running in a desktop browser, it was time to start testing on real devices and finally releasing our app to the masses!
Testing our app
At this point we spent a little over a week writing the code and tweaking the UI to where it felt right and whilst this was all surprisingly easy, the real challenges came once we started testing outside the browser and getting our app ready for distribution.
Ionic’s CLI simplifies testing on devices with 2 commands, namely ionic emulate and ionic run.
To use these commands, you first need to add the platforms you intend to distribute to.
In our case, iOS and Android:
ionic platform add ios
ionic platform add android
This creates the platform specific builds in the platforms/ directory where the app will be compiled into its native form.
To compile and run the app on a device emulator such as Xcode’s iPhone Simulator or the Android SDK Device Emulator, simply run:
ionic emulate ios
Alternatively, to compile and run the app straight onto any connected devices, run:
ionic run ios
Now, whilst the iPhone Simulator that comes bundled with Xcode launches quickly and runs the app as you’d expect, the same cannot be said for Android.
The Android Emulator that comes with the Android SDK is quite simply unusably slow in our experience, so as an alternative we used a nifty app call Genymotion.
The Genymotion app is quick to install and has a completely free option along with some paid options for larger groups of developers. Regardless of the price, this app helped us immensely with testing our app on Android and is simply a must when using Ionic for building Android applications.
One thing to note is that the Genymotion emulator will not launch by using ionic emulate android, but rather ionic run android as if it was a real device.
Once we were all set up and testing on emulators and real devices, it became quite clear that whilst the browser is fantastic for development, it’s quite far off the actual devices and we had quite a few bugs and fixes to iron out.
Another big problem for us was implementing app icons and splash screens. First of all this meant making changes inside the ‘platforms/’ directory, which is something we really would have preferred not to do. Secondly, the way these icons and splash screens were implemented in Ionic simply didn’t match up to either Apple or Android’s specifications.
We ended up using a really helpful site called makeappicon.com, which was able to give us at least a somewhat familiar looking set of icons to those that we found in the Ionic project.
This is something that could do with some serious attention as it took at least 2 days for what should be a very small task. That said, it’s important to remember that Ionic is still in beta and I’m sure that with the current interest and contribution we’ll see this process simplified very soon.
Distributing our app
Two weeks from discovering the Ionic framework, we had an app that was running well on both iOS and Android and we were ready to build and distribute.
Ionic has a very detailed guide to building and publishing for Android here. Luckily building iOS via Xcode is very easy and, seeing as Xcode manages provisioning profiles directly from iTunes Connect, it is most likely the preferred solution regardless of how Ionic would approach this.
Conclusion
So, after waiting for Apple’s ridiculously long review process, we had two apps live and it all took no more than 10 working days to complete.
That is quite impressive and much quicker than any previous app we’ve released, so is Ionic our new default app framework? For the most part yes; however, should a project come along that demands that extra premium feel and isn’t as time restricted, a native app might still win us over. Here’s what we’ve learnt and how we think hybrid apps compare to native apps when using the Ionic framework:
Performance
Whilst our app performs very well, it still uses CSS3 transitions and is more dependent on the user’s device than a native app would be. Something to bear in mind at least.
All in all, hybrid apps are still just slightly behind in terms of performance, but Ionic certainly has done a fantastic job and to most the difference will be negligible.
User Experience (UX)
This is a tricky one, native apps definitely have the advantage when it comes to creating platform specific looking and feeling apps, but customisation can be more complicated. Hybrid apps on the other hand are really easy to customise, but creating a native look and feel can be much more challenging.
Development
Working on our app has been an absolute joy, even compared to the very good Xcode. The time it takes to compile a native app after every code change makes a really big difference and our two weeks would have certainly been a lot longer, not to mention if using Android SDK and Eclipse!
Learning Curve
There’s no question learning AngularJS and the Ionic framework is going to be a much easier task for the average web dev than learning the likes of Objective-C or Java, not to mention that the same web technologies will cover all the platforms you decide to develop for. This is a really big advantage, especially for businesses that need to deal with staff changes, and it is the reason hybrid apps exist in the first place.
Update!
March 24th, 2015: The story continues – click here for how this blog post broke our website and how Nginx and Pagespeed helped fix it!